Blogger Custom Robots Header Tags Settings Complete Info
In our previous post we discussed about How To Add Robots.txt File In Blogger . Today we will discuss about Blogger custom robots tags settings. Search Engine Optimization means SEO, if you are interested in blogging and you want to increase traffic to your blog, then you have to optimize the blog correctly.
Today we will see in this post right way to create custom robots header tags in blogger blog. With this setting you can increase the visibility of your blog's in search engine.
You have heard about the search engine robots?
If you have not heard, I tell you, there are bots of search engine (google, yahoo, bing, etc) that crawl the pages of your blog. And your blog pages index that means search engine adding your page to their list and when someone searches for something, then Google shows results from their list.
Using header tags, we can decide what to show in the search engine and what not to show, It does affect our ranking.
Why To Use Custom Robots Header Tags?
If you do not use this tag, Google indexes by crawling all the pages of your blog .Which causes damage to your blog such as the problem of duplicate content, which makes it difficult to rank in google.
For example: http://www.example.com/2015_02_25_archive.html
These are two different urls but the contents of the archive url are the same as the content of the post. That's why the problem with duplicate content will be created.
Which means that your search engine visibility is low.
To prevent this, we must use the blogger's advanced settings custom robots header tag.
It is not used to prevent duplicate content but you can use it as per your convenience.
Also Read: 10 Trusted Free Money Making Apps for Android Phone
ROBOTS HEADER META TAGS MEANINGS
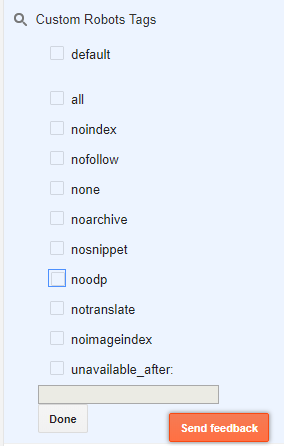
You can see these types of tags in Blogger, let's see what their meanings are:- all- This tag means content crawling and indexing.
- noindex- This tag means do not show in the search engine. You can use this tag if you do not want to show any pages in the search engine.
- nofollow- This tag means not giving importance to link. A link is provided on a page and it is used to prevent that link from being followed by google bot.
- none- This means neither follow the link nor index in the search engine.
- Noarchive- In the Google search result you will have seen in the bottom of the link cached is written, on which by clicking it puts the image of that page on it's server when indexing a page. This option is used to not show in the search engine cached page.
- nosnippet- This tag is used not to show the description that is below the title and url in the search engine.
- noodp-Open directory project / Dmoz can show google information,description, title from here. So noodp tag should be used so that we have a description, title which is kept in the blog also appear in Google itself.
- notranslate- This tag means not showing translation of site in another language.
- noimageindex- This tag means, do not index the image.
- unavailable_after- This tag can be used to delete a page some days later from Google automatically.
WHICH ROBOTS HEADER TAGS SETTING SHOULD BE DONE IN BLOGGER?
Follow the steps mentioned below for setting for Best SEO.
Step 1
Login to Blogger and select Blog then click on Settings> Search Preferences.Step 2
Here you have to click on yes
Step 3
This setting is SEO friendly for your blog, which can be used by you on your blog.- Homepage: Click on all in the homepage that will contain all content indexes of your home page and click on Noodp which will not take Google title and snippet (description) from the Open Directory Project.
- Archive and Search pages: Noindex in Archive and Search pages, from which archive pages will not index and there will be no problem with duplicate content. Click here also on the noodp.
- Default for Posts and Pages: Click on All in the Default for Posts and Pages so that your every post index. Click here also on the noodp.
- Click Save Changes.
Note: Apart from the settings shown in the above image, if you want to do settings then you can do just as if you have a personal blog and your SEO is not necessary.
HOW TO SET ROBOTS TAGS FOR ANY SINGLE POST
The above settings that you have made will apply to all your blogs. But if you want different settings of a robots tag for a post or page, this feature is also given to you by Blogger.Follow this:
When writing a post or editing, click on the right side of the Custom Robots Tag.
After the box opens, first untick the default and then select the tags you want for that post and click Done.
Suppose a post you does not want to index in Google then tick on noindex. You can use tags as per your convenience.
CONCLUSION:
In Blogger, this setting helps SEO your blog in the right direction and saves the blog from duplicate content.Custom Robots Header Tags is a great feature that allows you to easily use tags without having to edit the template.
If you have read the entire post, how to avoid duplicate content, the meaning of robots header tags, and the exact settings of these tags have been explained.
If there is any problem related to this, then please comment for asking.
And if possible, share the post on Facebook so that your bloggers also get information about this.
Thank You.


Comments
Post a Comment